Sarah vs Fenrir: mudanças entre as edições
Ir para navegação
Ir para pesquisar
(Criou página com '{{aviso |aviso = Este guia trata-se de um update futuro e permanecerá em inglês até o lançamento.<br>Fonte do guia: iROWiki.org}} '''<big><big>Entering the Instance</big>...') |
Sem resumo de edição |
||
| (11 revisões intermediárias por 2 usuários não estão sendo mostradas) | |||
| Linha 1: | Linha 1: | ||
{{Quest Info |
|||
{{aviso |
|||
| levelreq = 145 |
|||
|aviso = Este guia trata-se de um update futuro e permanecerá em inglês até o lançamento.<br>Fonte do guia: iROWiki.org}} |
|||
| partyreq = 1 pessoa ou mais |
|||
| insta = yes |
|||
| tipo = Instância |
|||
| duracao = 1 hora |
|||
| cooldown = 7 dias |
|||
| itemreward = {{Item List |id=607 |item=Fruto de Yggdrasil |simple=yes}}<br>{{Item List |id=608 |item=Semente de Yggdrasil |simple=yes}} |
|||
| instachefe = {{monster |id=3190 Sara Irine}} <ref>Originalmente, Sarah se escreve com '''H''', mas a tradução do Manhwa no Brasil não foi fiel ao original.</ref> |
|||
}} |
|||
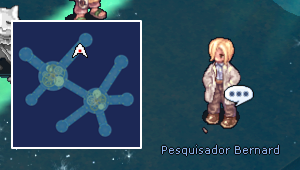
# No [[Espaço Dimensional]], fale com o Pesquisador Bernard {{navi|dali02|97|142}} |
|||
'''<big><big>Entering the Instance</big></big>'''<br /> |
|||
#:[[Arquivo:SarahFenrir01.png|link=]] |
|||
The quest/instance is accessed from the space-time dimensional gap, on the second floor.<br /> |
|||
# Acesse a [[instância]] pela Fenda Temporal, atrás do Professor. |
|||
Talk to '''Professor Bernhard''' {{navi|dali02|97|142}} to book the instance, and '''Dimensional Device''' to enter.<br /> |
|||
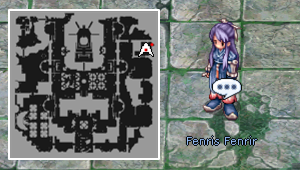
# Ao aproximar de Fenrir, um diálogo começa. |
|||
#:[[Arquivo:SarahFenrir02.png|link=]] |
|||
#* O personagem que ativou o diálogo ficará imóvel por um período. |
|||
#* Vários {{monster|id=3198 Galions Ancestrais}} serão invocados nesse tempo. |
|||
#* Seu [[grupo]] pode matá-los ou aguardar o ataque de Fenrir. |
|||
#* Assim que a conversa concluir, siga ao portal ao sul. |
|||
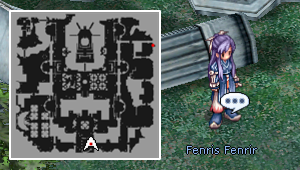
# Continue em frente até encontrar Fenrir no sul de Glast Heim. |
|||
#:[[Arquivo:SarahFenrir03.png|link=]] |
|||
#* Você pode ignorar as {{monster|id=3200 Quimeras Ancestrais}} pelo caminho, já que não tem nada de especial nelas. |
|||
#* Novamente, o personagem que ativar os diálogos ficará imóvel. |
|||
#* Ao final da conversa, você deverá decidir se segue com Fenrir ou ajuda o Professor. |
|||
#* É altamente recomendável que você não siga até Fenrir, uma vez que não há premiações especiais, apenas perda de tempo. |
|||
# Escolha seu caminho: |
|||
## '''Ajudando Fenrir'''. |
|||
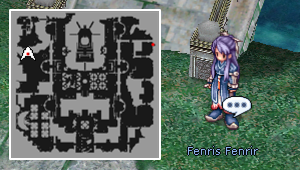
### Seu [[grupo]] terá 5 minutos para encontrar-se com Fenrir. |
|||
###:[[Arquivo:SarahFenrir04a.png|link=]] |
|||
### Siga até o ponto indicado no mini-mapa e fale com Fenrir. |
|||
### Um diálogo entre Fenrir e Sarah acontecerá, prepare-se para a luta! |
|||
###* Além de {{monster|id=3199 Dragões Ancestrais}}, também aparecerão 1 {{monster |id=3195 Gigante Imaterial}} (imune a danos físicos) e 1 {{monster |id=3194 Gigante Antimagia}} (imune a danos mágicos). |
|||
###* A etapa só estará completa quando os dois tipos de Gigantes forem eliminados. |
|||
### Finalize falando com Fenrir, você não ganhará nada por ter ajudado. |
|||
## '''Ajudando o Professor'''. |
|||
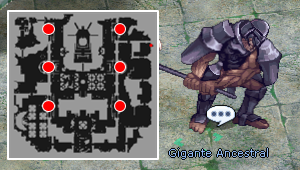
### Seu [[grupo]] terá 5 minutos para encontrar e eliminar até 6 {{monster |id=3196 Gigantes Ancestrais}}. |
|||
###:[[Arquivo:SarahFenrir04x.png|link=]] |
|||
###* Cada {{monster |id=3196 Gigante Ancestral}} fica no topo de uma torre e ataca quando se aproximam. |
|||
###* Junto com os {{monster |id=3196 Gigantes Ancestrais}}, aparecem também alguns {{monster |id=3191 Gigantes}}. |
|||
###* Ao ativar um Gigante, algumas {{monster |id=3197 Gárgolas Ancestrais}} aparecem nas saídas das torres para atacar. |
|||
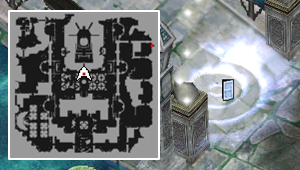
# Independente da escolha, após 5 minutos, Fenrir pedirá que você ajude-a a enfrentar Sarah Irine. |
|||
#:[[Arquivo:SarahFenrir05.png|link=]] |
|||
#* Um portal estará aberto no centro da cidade, seu [[grupo]] terá 5 minutos para alcançá-lo. |
|||
#* Caso não consiga chegar dentro do tempo, ela enfrentará Sarah sozinha. |
|||
#* Se seu [[grupo]] optou por enfrentar os Gigantes, você ainda pode eliminá-los até o último minuto caso queira também enfrentar a Sarah. |
|||
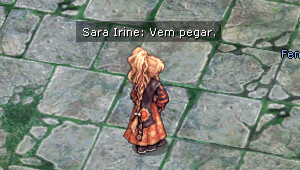
# Fale com Fenrir e siga ao portal em seguida, para chegar no parapeito do Castelo. |
|||
#:[[Arquivo:SarahFenrir06.png|link=]] |
|||
#* Após um breve diálogo, a batalha começa. |
|||
#* {{monster |id=3190 Sara Irine}} sempre recebe 1 de dano físico e mágico. |
|||
#* Durante a luta, aparecerão {{monster |id=3195 Gigantes Imateriais}} (imune a danos físicos) e {{monster |id=3194 Gigantes Antimagias}} (imune a danos mágicos). |
|||
#* Seu objetivo é aguardar Fenrir enfraquecer Sarah, o que pode levar algum tempo. |
|||
#* Assim que Fenrir der o aviso via [[broadcast]], seu [[grupo]] deve atacar {{monster |id=3190 Sara Irine}}. |
|||
#* {{monster |id=3190 Sara Irine}} terá 200 de [[HP]] quando enfraquecida. |
|||
#* Você tem 50 segundos para eliminar Sarah antes que Fenrir o faça. |
|||
#* Se passar desse tempo, Fenrir atacará Sarah e ela não dará [[itens]] ou [[EXP]]. |
|||
#* Se o líder do [[grupo]] não estiver no campo de visão da [[MVP]], a Sara morrerá sozinha. |
|||
# Após a luta, seu [[grupo]] precisa fugir da ira de Sarah. |
|||
#:[[Arquivo:SarahFenrir02.png|link=]] |
|||
#* Basta retornar até a entrada de Glast Heim, onde você começou a [[instância]]. |
|||
#* O tempo para escapar é de 5 minutos, o ideal é ignorar todos os [[monstros]] que vão aparecendo. |
|||
#* Se não conseguir fugir a tempo, os personagens serão intantaneamente mortos. |
|||
#* Não adianta usar itens como Amuleto de Siegfried, pois o personagem morrerá assim que for ressuscitado. |
|||
#Caso consigam escapar, fale com Fenrir. |
|||
#* Você receberá 1 {{Item |id=607 Fruto de Yggdrasil}} e 1 {{Item |id=608 Semente de Yggdrasil}}. |
|||
#* Saia da [[instância]] pelo portão de entrada da cidade. |
|||
# Reencontre o Professor Bernard para completar a missão. |
|||
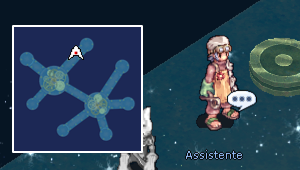
#* Você pode escolher 1 Brinco da Sarah (Locomoção ou Regeneração) falando com o Assistente. |
|||
#* Ele não pegará os {{Item |id=6803 Fragmentos de Gigantes}} que você conseguiu. |
|||
<br /><br /> |
|||
<references/> |
|||
'''<big><big>Walkthrough</big></big>''' |
|||
# When you approach Fenrir, dialogue will automatically begin. The character who approached Fenrir will be unable to move for a short period. |
|||
# A group of red Galion monsters will appear and attack the frozen player. After the mob has been killed, Fenrir will resume talking, then warp the party just south. |
|||
# Ignore the normal monsters (Chimera, etc), as they drop nothing of value and are not required for the quest. |
|||
# About 10 minutes after starting the instance, Sarah will begin attacking the player (in a deadly fashion). You'll want to reach the bottom of the map and trigger the next dialogue scene before this happens. |
|||
# You'll find Fenrir at the bottom middle of the map, near the entrance to the Glast Heim churchyard building. Approaching her will start automated dialogue, much like before. As the player conversing with Fenrir will be unable to move, use skills, or consume potions, they will be quite vulnerable to attack. |
|||
# Fenrir will disappear and ask you to meet her at the top left of the map (a marker will show on your mini-map). This is optional. |
|||
# There are six '''{{monster |id=3196 Ancient Gigantes}}''' on each of the parapet towers of Glast Heim. It will always drop a {{Item List |id=6803 |item=Shard of Gigantes |simple=yes}}, which can be used to enchant Sarah's Earrings. |
|||
# There are also '''{{monster |id=3191 Medium Ancient Gigantes}}''' which spawn along with the Ancient Gigantes.<br />'''Note:''' These Gigantes can drop {{Item List |id=15121 |item=Sarah's Battle Robe |simple=yes}} at 1% chance. |
|||
# After killing 3 '''{{monster |id=3196 Ancient Gigantes}}''', a portal will open at the top-center of the map, leading to Glast Heim castle.<br />'''Editor's Note:''' it is unclear to this wiki writer if the event at top-left will give you more time to fight Ancient Gigantes before Sarah and Fenrir confront one-another at the castle. If you linger too long killing Gigantes after your third kill, Fenrir will kill Sarah whether you're there or not! The portal to the castle area will disappear as well. |
|||
# Enter the portal at top center to start scenes between Sarah and Fenrir. |
|||
# '''{{monster |id=3194 Large Gigantes (Magical Immune)}}''' and '''{{monster |id=3195 Large Gigantes (Physical Immune)}}''' will spawn every 30 seconds or so at the 12, 6, and 9-o-clock directions of this battle area.<br />'''Note:''' These Gigantes drop nothing. <br />'''Note:''' '''{{monster |id=3190 Sarah Irine}}''' is immune to your attacks; you will need to wait for Fenrir to damage her. |
|||
# After Fenrir's attacks have weakened '''{{monster |id=3190 Sarah Irine}}''', an announcement will say she's in critical and she can be finished off. You have 50 seconds to kill her.<br />'''Note:''' Sarah has 200 HP and will only take 1 damage from all attacks.<br />'''Note:''' '''{{monster |id=3190 Sarah Irine}}''' can drop {{Item List |id=15121 |item=Sarah's Battle Robe |simple=yes}} at 10% chance. |
|||
# If you don't kill her in 50 seconds, she'll auto-die. You won't get exp or drops. |
|||
# You get warped out of the battle area. You need to "escape". Make your way to the bottom of the map, then the bottom right, then up to the top right.<br />'''Note:''' There will be a lot of monsters in your way, including many Gigantes (which do not drop any items). |
|||
# You get a {{Item List |id=607 |item=Yggdrasilberry |simple=yes}} if you talk to Fenrir. |
|||
== Encantamentos == |
|||
=== Acessórios === |
|||
# O Assistente só conversará com você caso tenha completado a instância {{navi|dali02|93|146}} |
|||
#:[[Arquivo:SarahFenrir09.png|link=]] |
|||
#* O [[NPC]] vende 1 Brinco por 1 {{Item |id=6803 Fragmento de Gigantes}}. |
|||
#** Você pode escolher entre os {{Item |id=28310 Brincos de Regeneração}} ou {{Item |id=28311 Brincos de Locomoção}} |
|||
#* É possível encantar os brincos ao custo de 4 {{Item |id=6803 Fragmentos de Gigantes}}. |
|||
#* O brinco aceita até 2 encantamentos, sendo 1 por vez. |
|||
#* Existe chances de falha e perda total do acessório e dos fragmentos. |
|||
#* Os brincos podem equipar em qualquer lado, mas existem encantos diferentes para cada lado. |
|||
#* Os encantos podem ser resetados ao custo de 1 {{Item |id=6803 Fragmento de Gigantes}}. |
|||
'''<big><big>Item Rewards and Enchantment</big></big>''' |
|||
After completing the instance for the first time, talk to '''Professor Bernhard''' to receive a reward. He will offer you a free accessory. You can choose between {{Item List |id=28310 |item=Sarah's Left Earring |simple=yes}} and {{Item List |id=28311 |item=Sarah's Right Earring |simple=yes}}. |
|||
Assistant Professor will offer to sell you a new {{Item List |id=28310 |item=Sarah's Left Earring |simple=yes}} or {{Item List |id=28311 |item=Sarah's Right Earring |simple=yes}} in exchange for 1 {{Item List |id=6803 |item=Shard of Gigantes |simple=yes}}. |
|||
You may instead enchant an earring (of the two types that can be purchased here) you have equipped. Enchantment will cost four (4) {{Item List |id=6803 |item=Shard of Gigantes |simple=yes}}. |
|||
{| |
|||
|- |
|||
| style="width: 1000px; text-align:center;" | '''<big><big>CRI and Critical Damage</big></big>''' |
|||
|} |
|||
{| |
|||
|- |
|||
| style="vertical-align: top;" | |
|||
{| class="wikitable" |
{| class="wikitable" |
||
|- |
|||
! style="background:#d1ebfd; text-align: left;" colspan="3" | Left Slot |
|||
|- |
|||
! % Chance !! style="width: 140px; text-align: left;" | Name !! style="width: 300px; text-align: left;" | Effect |
|||
|- |
|- |
||
! Opção !! Lado direito !! Lado esquerdo |
|||
| 20%? || CRI Lv1 || Critical Rate +2 |
|||
|- |
|- |
||
| |
| {{rh}} | Loki || |
||
* {{Item List |id=4939 |item=CRIT +2 |simple=yes}}, {{Item |id=4940 +4}} ou {{Item |id=4941 +6}} |
|||
* {{Item List |id=4863 |item=Fatal 1 |simple=yes}}, {{Item |id=4864 2}} ou {{Item |id=4865 3}} |
|||
| |
|||
* {{Item List |id=4939 |item=CRIT +2 |simple=yes}} ou {{Item |id=4940 +4}} |
|||
* {{Item List |id=4863 |item=Fatal 1 |simple=yes}} ou {{Item |id=4864 2}} |
|||
|- |
|- |
||
| {{rh}} | Chaos || |
|||
| 20%? || Fatal Lv1 || Critical Rate +1, Critical Damage +2% |
|||
* {{Item List |id=4832 |item=Mira Apurada 1 |simple=yes}}, {{Item |id=4833 2}} ou {{Item |id=4834 3}} |
|||
* {{Item List |id=4942 |item=Esquiva Perfeita +3|simple=yes}}, {{Item|id=4943 +4}} ou {{Item |id=4944 +5}} |
|||
| |
|||
* {{Item List |id=4832 |item=Mira Apurada 1 |simple=yes}} ou {{Item |id=4833 2}} |
|||
* {{Item List |id=4942 |item=Esquiva Perfeita +3|simple=yes}} ou {{Item|id=4943 +4}} |
|||
|- |
|- |
||
| {{rh}} | Fenrir || |
|||
| 20%? || Fatal Lv2 || Critical Rate +2, Critical Damage +4% |
|||
* {{Item List |id=4945 |item=Economia 1 |simple=yes}}, {{Item |id=4946 2}} ou {{Item |id=4947 3}} |
|||
* {{Item List |id=4897 |item=ATQM 3 |simple=yes}}, {{Item |id=4898 4}} ou {{Item |id=4899 ATQM 5}} |
|||
| |
|||
* {{Item List |id=4945 |item=Economia 1 |simple=yes}} ou {{Item |id=4946 2}} |
|||
* {{Item List |id=4897 |item=ATQM 3 |simple=yes}} ou {{Item |id=4898 4}} |
|||
|- |
|- |
||
| {{rh}} | Iris || |
|||
| 20%? || colspan="2" style="text-align: center;" | '''Item breaks!''' |
|||
* {{Item List |id=4869 |item=Anti-Atraso 1 |simple=yes}}, {{Item |id=4872 2}} ou {{Item |id=4873 3}} |
|||
|} |
|||
* {{Item List |id=4948 |item=Anti-Horário 1 |simple=yes}}, {{Item |id=4949 2}} ou {{Item |id=4950 3}} |
|||
|| || |
|||
| |
|||
{| class="wikitable" |
|||
* {{Item List |id=4869 |item=Anti-Atraso 1 |simple=yes}} ou {{Item |id=4872 2}} |
|||
|- |
|||
* {{Item List |id=4948 |item=Anti-Horário 1 |simple=yes}} ou {{Item |id=4949 2}} |
|||
! style="background:#cbecc5; text-align: left;" colspan="3" | Right Slot |
|||
|- |
|||
! % Chance !! style="width: 140px; text-align: left;" | Name !! style="width: 300px; text-align: left;" | Effect |
|||
|- |
|||
| 10%? || CRI Lv1 || Critical Rate +2 |
|||
|- |
|||
| 10%? || CRI Lv2 || Critical Rate +4 |
|||
|- |
|||
| 10%? || CRI Lv3 || Critical Rate +6 |
|||
|- |
|||
| 10%? || Fatal Lv1 || Critical Rate +1, Critical Damage +2% |
|||
|- |
|||
| 10%? || Fatal Lv2 || Critical Rate +2, Critical Damage +4% |
|||
|- |
|||
| 10%? || Fatal Lv3 || Critical Rate +3, Critical Damage +6% |
|||
|- |
|||
| 40%? || colspan="2" style="text-align: center;" | '''Item breaks!''' |
|||
|} |
|||
|} |
|} |
||
=== Armadura === |
|||
{| |
|||
# Você pode encantar o {{item|id=15121 Manto da Sara}} através da Gárgula {{navi|dali02|91|144}} |
|||
|- |
|||
#:[[Arquivo:SarahFenrir010.png|link=]] |
|||
| style="width: 1000px; text-align:center;" | '''<big><big>Expert Archer or Perfect Dodge</big></big>''' |
|||
#* O procedimento é exatamente igual ao das [[Glast Heim|Botas Temporais]]. |
|||
|} |
|||
#* Para encantar, traga a quantidade necessária de {{Item |id=6803 Fragmento de Gigantes}}. |
|||
{| |
|||
#* Os [[encantamentos]] do 4º [[slot]] podem ser escolhidos, mas não podem ser alterados uma vez que você já escolheu a opção. |
|||
|- |
|||
#* Após encantar 4 vezes, na 5ª vez você poderá encantar o 3º [[slot]]. |
|||
| style="vertical-align: top;" | |
|||
#* Você não poderá escolher o encanto do 3º [[slot]], sendo dado de maneira aleatória. |
|||
{| class="wikitable" |
|||
# As chances de encanto são sempre 100% de sucesso. |
|||
|- |
|||
! style="background:#d1ebfd; text-align: left;" colspan="3" | Left Slot |
|||
|- |
|||
! % Chance !! style="width: 140px; text-align: left;" | Name !! style="width: 300px; text-align: left;" | Effect |
|||
|- |
|||
| 20%? || Expert Archer Lv1 || Ranged Damage +2% |
|||
|- |
|||
| 20%? || Expert Archer Lv2 || Ranged Damage +4% |
|||
|- |
|||
| 20%? || Parrying Lv1 || Perfect Dodge +3 |
|||
|- |
|||
| 20%? || Parrying Lv2 || Perfect Dodge +4 |
|||
|- |
|||
| 20%? || colspan="2" style="text-align: center;" | '''Item breaks!''' |
|||
|} |
|||
|| || |
|||
{| class="wikitable" |
|||
|- |
|||
! style="background:#cbecc5; text-align: left;" colspan="3" | Right Slot |
|||
|- |
|||
! % Chance !! style="width: 140px; text-align: left;" | Name !! style="width: 300px; text-align: left;" | Effect |
|||
|- |
|||
| 10%? || Expert Archer Lv1 || Ranged Damage +2% |
|||
|- |
|||
| 10%? || Expert Archer Lv2 || Ranged Damage +4% |
|||
|- |
|||
| 10%? || Expert Archer Lv3 || Ranged Damage +6% |
|||
|- |
|||
| 10%? || Parrying Lv1 || Perfect Dodge +3 |
|||
|- |
|||
| 10%? || Parrying Lv2 || Perfect Dodge +4 |
|||
|- |
|||
| 10%? || Parrying Lv3 || Perfect Dodge +5 |
|||
|- |
|||
| 40%? || colspan="2" style="text-align: center;" | '''Item breaks!''' |
|||
|} |
|||
|} |
|||
{| class="wikitablec" |
|||
{| |
|||
|- |
|- |
||
! Local !! Encanto !! HP máx. !! Economia !! Pedra de Feitiço !! Anti-Horário !! Anti-Atraso !! Esquiva Perfeita !! {{Item |id=6803 Frag. de Gigante}} |
|||
| style="width: 1000px; text-align:center;" | '''<big><big>Conservation and MATK</big></big>''' |
|||
|} |
|||
{| |
|||
|- |
|||
| style="vertical-align: top;" | |
|||
{| class="wikitable" |
|||
|- |
|||
! style="background:#d1ebfd; text-align: left;" colspan="3" | Left Slot |
|||
|- |
|||
! % Chance !! style="width: 140px; text-align: left;" | Name !! style="width: 300px; text-align: left;" | Effect |
|||
|- |
|- |
||
! rowspan=5| Slot 4 |
|||
| 20%? || Economy Lv1 || SP Cost of skills -2% |
|||
|- |
|- |
||
| 1ª vez |
|||
| 20%? || Economy Lv2 || SP Cost of skills -4% |
|||
| {{item List|id=4862 |item=HP +2%|simple=yes}} |
|||
| {{item List|id=4929 |item=SP +1%|simple=yes}} |
|||
| {{item List|id=4886 |item=PF 2|simple=yes}} |
|||
| {{item List|id=4807 |item=V. Atq +1|simple=yes}} |
|||
| {{item List|id=4869 |item=AA 1|simple=yes}} |
|||
| {{item List|id=4859 |item=Esqv +1|simple=yes}} |
|||
| 1 |
|||
|- |
|- |
||
| 2ª vez |
|||
| 20%? || MATK Lv1 || MATK +3% |
|||
| {{item List|id=4867 |item=HP +3%|simple=yes}} |
|||
| {{item List|id=4945 |item=E 1|simple=yes}} |
|||
| {{item List|id=4887 |item=PF 3|simple=yes}} |
|||
| {{item List|id=4948 |item=AH 1|simple=yes}} |
|||
| {{item List|id=4872 |item=AA 2|simple=yes}} |
|||
| {{item List|id=4942 |item=EP +3|simple=yes}} |
|||
| 4 |
|||
|- |
|- |
||
| 3ª vez |
|||
| 20%? || MATK Lv2 || MATK +4% |
|||
| {{item List|id=4868 |item=HP +4%|simple=yes}} |
|||
| {{item List|id=4946 |item=E 2|simple=yes}} |
|||
| {{item List|id=4888 |item=PF 4|simple=yes}} |
|||
| {{item List|id=4949 |item=AH 2|simple=yes}} |
|||
| {{item List|id=4873 |item=AA 3|simple=yes}} |
|||
| {{item List|id=4943 |item=EP +4|simple=yes}} |
|||
| 15 |
|||
|- |
|- |
||
| 4ª vez |
|||
| 20%? || colspan="2" style="text-align: center;" | '''Item breaks!''' |
|||
| {{item List|id=4900 |item=HP +5%|simple=yes}} |
|||
|} |
|||
| {{item List|id=4947 |item=E 3|simple=yes}} |
|||
|| || |
|||
| {{item List|id=4889 |item=PF 5|simple=yes}} |
|||
{| class="wikitable" |
|||
| {{item List|id=4950 |item=AH 3|simple=yes}} |
|||
|- |
|||
| {{item List|id=4881 |item=AA 4|simple=yes}} |
|||
! style="background:#cbecc5; text-align: left;" colspan="3" | Right Slot |
|||
| {{item List|id=4944 |item=EP +5|simple=yes}} |
|||
| 30 |
|||
|- |
|- |
||
! colspan=2| Slot 3 |
|||
! % Chance !! style="width: 140px; text-align: left;" | Name !! style="width: 300px; text-align: left;" | Effect |
|||
| colspan=6 | '''Encanto especial''' || 10 |
|||
|- |
|||
| 10%? || Economy Lv1 || SP Cost of skills -2% |
|||
|- |
|||
| 10%? || Economy Lv2 || SP Cost of skills -4% |
|||
|- |
|||
| 10%? || Economy Lv3 || SP Cost of skills -6% |
|||
|- |
|||
| 10%? || MATK Lv1 || MATK +3% |
|||
|- |
|||
| 10%? || MATK Lv2 || MATK +4% |
|||
|- |
|||
| 10%? || MATK Lv3 || MATK +5% |
|||
|- |
|||
| 40%? || colspan="2" style="text-align: center;" | '''Item breaks!''' |
|||
|} |
|||
|} |
|} |
||
{|class=wikitable |
|||
{| |
|||
|- |
|- |
||
! colspan=2 | Encanto especial |
|||
| style="width: 1000px; text-align:center;" | '''<big><big>Delay After Attack or Delay After Skill</big></big>''' |
|||
|} |
|||
{| |
|||
|- |
|||
| style="vertical-align: top;" | |
|||
{| class="wikitable" |
|||
|- |
|||
! style="background:#d1ebfd; text-align: left;" colspan="3" | Left Slot |
|||
|- |
|||
! % Chance !! style="width: 140px; text-align: left;" | Name !! style="width: 300px; text-align: left;" | Effect |
|||
|- |
|- |
||
! Encanto !! Chance |
|||
| 20%? || Delay After Attack Lv1 || ASPD + 4% |
|||
|- |
|- |
||
| {{rh}} | {{Item List|id=4831 |item=Pedra de Encantamento 10|simple=yes}} || 50% |
|||
| 20%? || Delay After Attack Lv2 || ASPD + 6% |
|||
|- |
|- |
||
| {{rh}} | {{Item List|id=29447 |item=Pedra de Amplificação 3|simple=yes}} || 30% |
|||
| 20%? || Delay After Skill Lv1 || Global skill delay -2% |
|||
|- |
|- |
||
| {{rh}} | {{Item List|id=4876 |item=Epifania|simple=yes}} || 20% |
|||
| 20%? || Delay After Skill Lv2 || Global skill delay -4% |
|||
|- |
|||
| 20%? || colspan="2" style="text-align: center;" | '''Item breaks!''' |
|||
|} |
|||
|| || |
|||
{| class="wikitable" |
|||
|- |
|||
! style="background:#cbecc5; text-align: left;" colspan="3" | Right Slot |
|||
|- |
|||
! % Chance !! style="width: 140px; text-align: left;" | Name !! style="width: 300px; text-align: left;" | Effect |
|||
|- |
|||
| 10%? || Delay After Attack Lv1 || ASPD + 4% |
|||
|- |
|||
| 10%? || Delay After Attack Lv2 || ASPD + 6% |
|||
|- |
|||
| 10%? || Delay After Attack Lv3 || ASPD + 8% |
|||
|- |
|||
| 10%? || Delay After Skill Lv1 || Global skill delay -2% |
|||
|- |
|||
| 10%? || Delay After Skill Lv2 || Global skill delay -4% |
|||
|- |
|||
| 10%? || Delay After Skill Lv3 || Global skill delay -6% |
|||
|- |
|||
| 40%? || colspan="2" style="text-align: center;" | '''Item breaks!''' |
|||
|} |
|||
|} |
|} |
||
Edição atual tal como às 04h10min de 10 de julho de 2023
| Requisitos mínimos | |
|---|---|
| Nv. de base: | 145 |
| Tipo: | Instância |
| Duração: | 1 hora |
| Retorno: | 7 dias |
| Grupo: | 1 pessoa ou mais |
| Premiação | |
| Chefe da instância: | Sara Irine [1] |
| Itens: |  Fruto de Yggdrasil Fruto de Yggdrasil Semente de Yggdrasil Semente de Yggdrasil
|
- No Espaço Dimensional, fale com o Pesquisador Bernard
- Acesse a instância pela Fenda Temporal, atrás do Professor.
- Ao aproximar de Fenrir, um diálogo começa.
- O personagem que ativou o diálogo ficará imóvel por um período.
- Vários Galions Ancestrais serão invocados nesse tempo.
- Seu grupo pode matá-los ou aguardar o ataque de Fenrir.
- Assim que a conversa concluir, siga ao portal ao sul.
- Continue em frente até encontrar Fenrir no sul de Glast Heim.
- Você pode ignorar as Quimeras Ancestrais pelo caminho, já que não tem nada de especial nelas.
- Novamente, o personagem que ativar os diálogos ficará imóvel.
- Ao final da conversa, você deverá decidir se segue com Fenrir ou ajuda o Professor.
- É altamente recomendável que você não siga até Fenrir, uma vez que não há premiações especiais, apenas perda de tempo.
- Escolha seu caminho:
- Ajudando Fenrir.
- Seu grupo terá 5 minutos para encontrar-se com Fenrir.
- Siga até o ponto indicado no mini-mapa e fale com Fenrir.
- Um diálogo entre Fenrir e Sarah acontecerá, prepare-se para a luta!
- Além de Dragões Ancestrais, também aparecerão 1 Gigante Imaterial (imune a danos físicos) e 1 Gigante Antimagia (imune a danos mágicos).
- A etapa só estará completa quando os dois tipos de Gigantes forem eliminados.
- Finalize falando com Fenrir, você não ganhará nada por ter ajudado.
- Seu grupo terá 5 minutos para encontrar-se com Fenrir.
- Ajudando o Professor.
- Seu grupo terá 5 minutos para encontrar e eliminar até 6 Gigantes Ancestrais.
- Cada Gigante Ancestral fica no topo de uma torre e ataca quando se aproximam.
- Junto com os Gigantes Ancestrais, aparecem também alguns Gigantes.
- Ao ativar um Gigante, algumas Gárgolas Ancestrais aparecem nas saídas das torres para atacar.
- Seu grupo terá 5 minutos para encontrar e eliminar até 6 Gigantes Ancestrais.
- Ajudando Fenrir.
- Independente da escolha, após 5 minutos, Fenrir pedirá que você ajude-a a enfrentar Sarah Irine.
- Fale com Fenrir e siga ao portal em seguida, para chegar no parapeito do Castelo.
- Após um breve diálogo, a batalha começa.
- Sara Irine sempre recebe 1 de dano físico e mágico.
- Durante a luta, aparecerão Gigantes Imateriais (imune a danos físicos) e Gigantes Antimagias (imune a danos mágicos).
- Seu objetivo é aguardar Fenrir enfraquecer Sarah, o que pode levar algum tempo.
- Assim que Fenrir der o aviso via broadcast, seu grupo deve atacar Sara Irine.
- Sara Irine terá 200 de HP quando enfraquecida.
- Você tem 50 segundos para eliminar Sarah antes que Fenrir o faça.
- Se passar desse tempo, Fenrir atacará Sarah e ela não dará itens ou EXP.
- Se o líder do grupo não estiver no campo de visão da MVP, a Sara morrerá sozinha.
- Após a luta, seu grupo precisa fugir da ira de Sarah.
- Basta retornar até a entrada de Glast Heim, onde você começou a instância.
- O tempo para escapar é de 5 minutos, o ideal é ignorar todos os monstros que vão aparecendo.
- Se não conseguir fugir a tempo, os personagens serão intantaneamente mortos.
- Não adianta usar itens como Amuleto de Siegfried, pois o personagem morrerá assim que for ressuscitado.
- Caso consigam escapar, fale com Fenrir.
- Você receberá 1 Fruto de Yggdrasil e 1 Semente de Yggdrasil.
- Saia da instância pelo portão de entrada da cidade.
- Reencontre o Professor Bernard para completar a missão.
- Você pode escolher 1 Brinco da Sarah (Locomoção ou Regeneração) falando com o Assistente.
- Ele não pegará os Fragmentos de Gigantes que você conseguiu.
- ↑ Originalmente, Sarah se escreve com H, mas a tradução do Manhwa no Brasil não foi fiel ao original.
Encantamentos
Acessórios
- O Assistente só conversará com você caso tenha completado a instância
- O NPC vende 1 Brinco por 1 Fragmento de Gigantes.
- Você pode escolher entre os Brincos de Regeneração ou Brincos de Locomoção
- É possível encantar os brincos ao custo de 4 Fragmentos de Gigantes.
- O brinco aceita até 2 encantamentos, sendo 1 por vez.
- Existe chances de falha e perda total do acessório e dos fragmentos.
- Os brincos podem equipar em qualquer lado, mas existem encantos diferentes para cada lado.
- Os encantos podem ser resetados ao custo de 1 Fragmento de Gigantes.
| Opção | Lado direito | Lado esquerdo |
|---|---|---|
| Loki | ||
| Chaos |
|
|
| Fenrir |
| |
| Iris |
|
|


Armadura
- Você pode encantar o Manto da Sara através da Gárgula
- O procedimento é exatamente igual ao das Botas Temporais.
- Para encantar, traga a quantidade necessária de Fragmento de Gigantes.
- Os encantamentos do 4º slot podem ser escolhidos, mas não podem ser alterados uma vez que você já escolheu a opção.
- Após encantar 4 vezes, na 5ª vez você poderá encantar o 3º slot.
- Você não poderá escolher o encanto do 3º slot, sendo dado de maneira aleatória.
- As chances de encanto são sempre 100% de sucesso.

| Local | Encanto | HP máx. | Economia | Pedra de Feitiço | Anti-Horário | Anti-Atraso | Esquiva Perfeita | Frag. de Gigante |
|---|---|---|---|---|---|---|---|---|
| Slot 4 | ||||||||
| 1ª vez |  HP +2% HP +2%
|
 SP +1% SP +1%
|
 PF 2 PF 2
|
 V. Atq +1 V. Atq +1
|
 AA 1 AA 1
|
 Esqv +1 Esqv +1
|
1 | |
| 2ª vez |  HP +3% HP +3%
|
 E 1 E 1
|
 PF 3 PF 3
|
 AH 1 AH 1
|
 AA 2 AA 2
|
 EP +3 EP +3
|
4 | |
| 3ª vez |  HP +4% HP +4%
|
 E 2 E 2
|
 PF 4 PF 4
|
 AH 2 AH 2
|
 AA 3 AA 3
|
 EP +4 EP +4
|
15 | |
| 4ª vez |  HP +5% HP +5%
|
 E 3 E 3
|
 PF 5 PF 5
|
 AH 3 AH 3
|
 AA 4 AA 4
|
 EP +5 EP +5
|
30 | |
| Slot 3 | Encanto especial | 10 | ||||||
| Encanto especial | |
|---|---|
| Encanto | Chance |
 Pedra de Encantamento 10 Pedra de Encantamento 10 |
50% |
 Pedra de Amplificação 3 Pedra de Amplificação 3 |
30% |
 Epifania Epifania |
20% |